Chocolate Cupcakes
Decorating with Real Butter Frosting
I did try cake decoration on my own, once. Bought a bunch of tips and a book. I was frustratingly iincompetent in my first attempts to forge a concoction of sugar and fat and colour into those clever little rosebuds that cake decorators create by the perfectly consistent dozen.
Turns out that what my daughters do with apparently self-taught ease is actually quite challenging, at least for me. Considerable skill is involved in creating the perfect scuptable medium, e. g., frosting, and in manipulating those tiny steel extruder tips to form perfect little delectable shapes.
I blame my ineptness, of course, on my own mother. What she taught me about food was this: use really good ingredients, honour them with love and respect, don’t fuss too much, and nothing can go seriously wrong in the kitchen. Simplicity, rather than fuss, was the keynote. Fancy cakes were for weddings and came from the bakery. And of course, like too much attention to hem length and mascara, in the 60s it was unfashionable for my generation to be overly focused on domesticity.
How things change
Colleen Morrison takes cake décor seriously enough to have gone to Chicago to the Wilton academy to learn how. And her method works.

Cake decorating requires a step-by-step process that can be learned in a few classes plus some hours of practice outside of class. Each course at Chantilly is four sessions. The cost is $90 for the four classes, and this includes the kit (tips, bags, practice board, and a revolving cake decorating stand) a book, and items borrowed from Colleen, whose generosity in providing colour, piping gel and other stuff is just wonderful. The classes are packed—register early—and hilarity and high tension alternate as a bunch of people crowd into Dini’s office and try not to throw too much sugar on her computer keyboard.
I found the best part was getting home, where you have your whole kitchen (I was up until 1:30 am twice) to play with colour mixing and shaping the sugar into puffs, flowers, leaves and—well, anything goes, really. The mind boggles, when let loose.
The banana chocolate cupcakes (recipe follows) are a hit with kids and adults alike. Mine were for Hallowe’en, but you can vary the colours to suit the occasion. If you want to avoid the chocolate, substitute another ¼ cup flour for the cocoa and you’ll have banana cupcakes.
The basic equipment
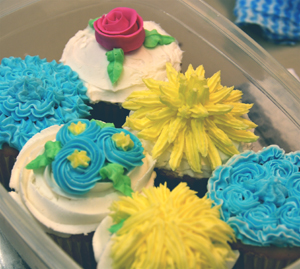
This decorating scheme is very simple—a swirl of frosting on the cupcake, and dots in a different colours.
• muffin tin
• cupcake papers (use the tin foil ones and eliminate the need for muffin tin)
• Cake release (Chantilly)
• beaters or a strong arm and a wisk
• 1 plastic piping bag for each colour you use
• 1 plastic coupler for each colour, to position the tip in the bag
• food colouring: the widest variety of colours is at Chantilly. Ordinary food colouring comes in red, blue, green and yellow, and they work, but less reliably.
• a number 3 piping tip (use with coupler)
• a number 1M piping tip (use without coupler)
• containers for mixing the frosting colours
Chocolate Banana Cupcakes
Benefits from bananas, and from less sugar than usual — Splenda is used for half the sweetener. Makes a moist, tender cupcake.
Preheat the oven to 350° F.
NB: I learned when I bought an oven thermometer recently that my oven heats to 40 degrees less than the thermostat reads — which may explain the indifferent results my past baking sometimes has yielded. A great investment.
NB 2: the cupcake papers make a difference. The point of the papers is to remove the cupcake from the tin easily, but removing the paper from the cupcake is the next challenge in life. A spot of Cake Release or even veggie oil on the bottom of the paper, and rubbed around, is one solution. Another is to buy the high quality foil lined cupcake papers — they eliminate the need for a muffin tin, as they stand alone on a cookie sheet in the oven, and release the cupcake without wasting a crumb. Sprays contain propane as a propellant, and I won’t use them but if you’re less fussy about eating petroleum, go ahead.
Cupcake recipe
2 bananas, mashed
¾ cup buttermilk
½ cup brown sugar
½ cup Splenda (or use another ½ cup sugar, white or brown)
2 tsp vanilla
2 eggs
½ cup vegetable oil
¼ cup strong coffee
½ cup cocoa
1 ½ cups flour
1 tsp baking soda
1 tsp salt
¾ cup Callebaut chocolate bits, dark or milk chocolate, or chocolate chips
Mix well all the wet ingredients, then add the cocoa, flour, baking soda, and salt, and mix these in very thoroughly. Beat if possible for 2 minutes. Then stir in the chocolate bits.
Fill muffin tins only 1/3 full for smallish cupcakes with room IN the cupcake paper for the icing; if you want big plump cupcakes that overflow the paper, fill two thirds full. Makes about 21 small or 18 large cupcakes. I have found that once you add the icing, if you’re doing it with piped decorative stuff, the total cupcake plus icing is enough in the small variety, especially for children.
Decorative Butter Icing
This recipe makes enough for 2 batches of cupcakes. It lasts for two weeks in the refrigerator, and you can freeze the leftovers.
2 cups ( 1 lb) unsalted butter, at room temperature
2 lbs. icing sugar plus more for “stiffening” the mix for piping it
6 tbsp milk
2 tbsp meringue powder
2 tsp vanilla
cake decorating colours
The Wilton class approach uses Crisco instead of butter. I prefer the taste and consistency of butter. You may have to add later small amounts of sugar and milk in order to achieve the right consistency — the first key to good decorative technique. Other people in the class used cream cheese icing to good effect.
Soften the butter and mix in the icing sugar in a double boiler. Over, not in, gently simmering water, stir the butter into the sugar, add the milk, and beat with hand-held beater as the mixture softens and mixes into a creamy spreadable frosting. Remove from heat after 2-3 minutes and continue beating. Cool completely.
Refrigerate the icing for one hour minimum. The butter will have melted somewhat, and you need it to be stiff again, for the decorating process. Add icing sugar or milk to achieve the right “medium” texture: consistency of the icing is KEY #1 to the Wilton cake decorating method. For the cupcakes pictured here, a medium stiff icing is needed: a spatula stuck into the icing should stand straight up but lean slightly when you jiggle the container.
Use the 1M tip to make the basic swirl of icing on the cupcake, and the number 3 tip, with a coupler, for the dots.
Use small bowls or containers to mix colours you want. When using the Wilton colours (I recommend these, despite their higher cost than the baking aisle supermarket variety — the colours are really brilliant, and they go a very long way), remove the top but leave the foil on the jar, and use a toothpick to extract small amounts of colour and mix it in gradually. You can get very bright colours or beautiful pastels.)
Click here to learn about a class on decorating cookies


