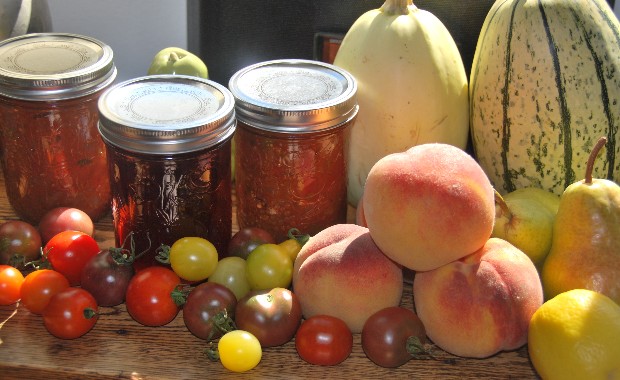
Chunky Tomato Basil Tomato Sauce
Peach Chutney
Plum Jam
Making jam or chutney in a small batch means that you don’t have to make enough of any one thing to feed an army. It’s easy and fun to make just enough for a few jars at a time — and you can do this in one evening in the kitchen. The satisfaction of seeing your own preserves on the shelf is amazing!
Traditional preserving meant hours of chopping and days wiping foreheads over steaming pots. The result was shelves of quart jars of beans, peaches, pears, apricots and pickles—enough to see you through the winter. This image of preserving endures—and puts most people right off. After all, you can buy this stuff—jams, pickles, chutney. And you have a life.
However, no commercial jam tastes as good as apricot jam made at home, for instance, or has the crunch and zing of homemade pickles or chutney. Also, homemade preserves are easy on the wallet.
General notes on canning food
Preserving food is essential to life as we know it, and has been since prehistoric times. Cooked meat lasts longer than raw; cooked fruits and vegetables can last for years if cared with close attention to destroying the bacteria that otherwise makes it spoil. Drying, salting and freezing are other preservation techniques, but the availability of heat and glass containers made canning a staple kitchen skill from the 17th century on.
Canning—the preservation of food by first cooking it, then saving it in hygienic sealed jars from which air is excluded—is not difficult, but some people are frightened by tales of botulism and other dire threats of inadequate canning techniques. Canning does require close attention to basic hygiene, to the preparation of foods, the time of cooking, the acid content, and the time in the canning bath. One misstep and your produce could go bad, in which case eating it will cause food poisoning.
More about canning:
http://www.gov.mb.ca/ana/pdf/nhfi_basics_canning.pdf
http://nchfp.uga.edu/how/can_07
http://www.dummies.com/how-to/content/follow-canning-and-preserving-rules.html
Once you feel comfortable about the basics, it’s time to jump in and make some jam or pickles.
Equipment for Home Canning
• 1 large stainless or enameled iron pot for cooking the preserve
• 1 large canning pot. It does not have to be an official canning pot, but must have a rack on the bottom to allow boiling water to circulate under the jars; it must also have a lid; and it must be large enough to accommodate the height of your canning jars plus one inch of water plus a few inches of space to prevent boiling over.
• clean, heatproof glass jars
• snap lids (two piece variety) or paraffin wax to melt and put over the produce
• tongs for removing jars from boiling water
• a few clean tea towels and some paper towel
Very useful though not absolutely essential are
• a wide-mouth funnel to help avoid mess when filling jars
• a ladle
• a skimmer spoon (wide flat spoon with holes)
• waterproof silicone oven mitts
Steps for safe food preservation using a canning bath:
- Clean all equipment. The micro-organisms that can cause food to spoil are bacteria, mold, dust and yeast. Eliminating these at each stage will ensure your produce is conserved safely;
- Use only good quality produce, free from rot, mold, black spot, insects, dirt;
- Sterilize jars by either boiling in the canning pot for 10 minutes at a rapid boil or heating in a 300° F oven for 20 minutes; and
- Make sure your product has been brought to a boiling point before putting it into the jars.
When processing food, do as follows:
- fill jar leaving 1 cm air space;
- ensure sealing lid is warmed and sterile;
- screw on the sealer ring finger tight before placing into the canning bath—air must be able to escape from the jar, so you can’t tighten it fully until jars have been processed and cooled;
- time the processing exactly. In Revelstoke, at 1,453 ft above sea level, water boils at a lower temperature, so processing time must be 5-10 minutes longer than called for in a recipe written for sea level; if using a thermometer, the processing temperature must reach 217° F; and
- put hot jars onto a tea towel when you take them out of the canning bath—not onto a cold surface.
Using the sterile jar and paraffin wax method
This method can be used safely for jams, jellies and chutneys instead of a canning bath, if you don’t have a canning pot. However, the jams and chutneys so produced cannot be sold at community or other markets, as some research suggests that small cracks can form in the wax that allow molds to penetrate the food. But my mother and grandmother, and probably yours too, used this method all their lives for jam and jelly, and many people still rely on it.
I prefer the canning bath to the slight mess of melted paraffin wax. A canning bath is mandatory however if you are making fruit preserves in juice, rather than a sweetened or vinegared product. But if you don’t have a huge pot with a lid and an interior rack, and you plan to eat your jams all up in the next three months, or to keep them refrigerated, here’s how to do it:
- Sterilize all equipment, including tongs, spoons and funnel, as well as jars, ahead of time and keep them sterile;
- Remove jars from sterilization water or oven using tongs, not your hands;
- As soon as jars are removed from sterilization process, fill them with the boiled produce using sterile spoons and funnel. Leave at least an inch at the top of the jar, and make sure no produce at all drips on the insides where the wax will sit; and
- Have melted paraffin wax ready — it should be thoroughly melted to a liquid and slightly cooled but warm enough to pour easily. Spoon it onto the slightly cooled produce to a level of about 1 cm. This may take several spoonfuls. Cool the wax as the jar cools — you may have to add more, as it tends to sink into the produce in the middle of the jar and get thin around the edges. You need a good centimeter of wax all around. Protect the wax with a cover of foil, waxed paper, or cloth held on with a rubber band, or the original lid for the recycled jar.
A quick note about the recipes: these are small batch recipes. You cannot always double or triple them, as the pectin, acid, heat and quantity interact to produce the thick, jam-like quality that shows the fruit has “gelled.” The gelling action may differ if you change up the quantities. Look online for large batch preserves. Or experiment with these recipes, but read up first about the tests for gelling, and the possible addition of pectin or acid to larger quantities of fruit.
Chunky Tomato Basil and Garden Herb Sauce
This is a zingy tomato sauce with lots of garlic — perfect for pasta or pizza on those around-the-corner fall days. It has so much flavour you can use about half the usual amount. Just a tablespoon atop garlic pasta or spiraled zucchini faux spaghetti gives a huge flavour punch.
Four pounds of tomatoes makes three half-litre jars of sauce.
16 Roma tomatoes, or 4 lbs any tomatoes
1 cup chopped onion
1 whole head of garlic if heads are small, half if large
2/3 cup red wine
4 tbsp red or white wine vinegar
2 tbsp Balsamic vinegar
½ cup chopped fresh basil
¼ cup chopped fresh oregano, thyme, mint and parsley, mixed
1 tsp coarse salt
½ tsp sugar
Put the wine into a large pot and add the onions. While they cook over low heat, peel and chop the tomatoes as follows:
- Fill a large saucepan or deep sauté pan with water and bring it to the boil. Put in all the tomatoes and bring to another boil. Use a fork to remove each tomato and peel it. Remove the nib where the fruit was attached to the vine;
- While you wait for the water to boil, cut the head of garlic in two and zap each half in the microwave oven for 20 seconds. This softens the garlic so it’s easy to peel. Get rid of the skin, then first chop and next mash the garlic. Add to the onions and wine;
- Chop the tomatoes and add to the pot of onions and wine;
- Add all the other ingredients and simmer the sauce for 40 minutes, until the tomatoes and onions begin to disappear;
- Being careful while handling the hot sauce, remove 1 cup of sauce and whiz in a blender to a fine pulp. Return this thick sauce to the pot and stir. Taste for salt and correct flavour if necessary. If you don’t have a blender, mash with a fork until the cup of sauce is smooth and thick; and
- Process in hot jars using one of the methods described above. Cool before sealing jars with a final twist to tighten the sealing ring, and label.
Peach Chutney
Wonderful with ham or pork, this sweet-sour chutney also makes a great companion to cheese and crackers, or to Asian dishes as an alternative to mango chutney. The garlic seems excessive, but baking it mellows the flavour. The peaches benefit from extra flavour from the apples, apricots, raisins and vinegars.
Peach skins are easily removed from ripe fruit if you boil the peaches for 1 minute then score the skin — it will slip off easily. If the fruit is underripe, this doesn’t work. Makes 5-6 half-litre jars or 3+ litre jars.
2 heads garlic
2 large or three medium apples, peeled, cored and chopped
4-5 peaches, skinned, stoned and chopped
1 cup chopped onion
1 tbsp grated fresh ginger
1 cup golden raisins
½ cup dried apricots, chopped, or 1 cup fresh apricots, peeled, stoned and chopped
1 cup brown sugar
1 ¼ cups cider vinegar
¼ cup balsamic vinegar
½ tsp allspice
½ tsp salt
- Roast the garlic, wrapped in foil, in the oven for 40 minutes or until it’s completely soft. Squeeze out each clove, and chop then mash until it’s a paste. Remove any garlic pieces that seem not to mash. Mix with the grated ginger, the allspice, the salt and the vinegars.
- Put all the ingredients into a large stainless steel or enameled pot. Bring to a boil and simmer at a low boil uncovered for 30 minutes. Stir frequently.
- Remove hot jars from water bath and fill with the chutney to 1 cm below the edge of the jar. Seal with hot sealing lid and sealing ring.
- Process in canning bath for 15 minutes (Revelstoke time) for half-pint jars and 20 minutes for quart jars. Cool and check final twist on sealing ring.
Plum Jam
You don’t have to remove the skins, in this recipe.
Makes 3+ half-litre jars.
With so many plums in Revy, this is a natural. Far better to have jam in January than to let the bears get all this fruit.
Most varieties of plums are high in pectin, the naturally occurring gum-like element that combines with acid to form a gel, the basis the thick quality of jams, jellies and chutneys. However, to be sure, I like to add some lemon juice and zest.
Also, I use a thermometer to show that the jam is at the gel point — 217° F. You can cool then reheat the jam once, but more than that, if it reaches the required temperature both times, will result in very thick jam!
3 lbs plums
4 cups sugar
1 cup water
¼ cup fresh lemon juice
grated zest of one lemon
- Wash the plums, remove stones, and chop. Put into a large pot and cover with the sugar. Add water and lemon juice and zest. Let sit for an hour.
- Bring to a boil over high heat, then reduce heat and keep mixture at a low boil for an hour or more, until the sugar clarifies, the plums melt, and the temperature reaches 217 F.
- Use a skimming spoon to remove the white froth that comes to the top—this consists of impurities in the sugar, and won’t harm anyone but does rather spoil the clarity of the finished jam.
- Remove from the heat and spoon into sterile, hot jars. Seal with wax or process in a canning bath for 10 minutes. Cool, check sealing rings and twist tight, and label.
This jam is quite sweet—delicious on toast, on ice cream, as a sealing layer on the bottom of a fruit tart, or with yogurt.
Okanagan College Workshops
Small Batch Preserves Sept 21
If you’re unsure about the process and safety of preserving foodscome to the Savage Delights workshop on September 21, sponsored by Okanagan College. (Call 250-837-4235 for more information.) We’ll do three more recipes—for Norfolk Chutney, Bread and Butter Pickles and for the berry-pickers out there, Bumbleberry Jam.
We’ll make three different items, all of which you get to take home: Bumbleberry Jam, Bread and Butter Pickles and Norfolk Chutney. You bring the jars and a pound of berries, we bring the rest. So come jam with us on the 21st. Venue is the Anglican Church, registration is at the College.
Future cooking workshops:
October 5 — Best of Gluten-Free—we will experiment with different bread and baked goods to try to find the best !
November 2 — Easy Oven Entrees
November 9 — Moroccan Cooking
Call 250-837-4235 to register
Chantilly Kitchen Bed and Bath stocks canning gear:
Pot, $100.
Rack for pot, $12.95
Jar lifter, $6.95
Set of lifter, tongs, wrench, funnel and magnet, $24.99
Jelly bag, $16.99
Chantilly also carries labels, jelly bags, cheesecloth and a terrific selection of bright silicone waterproof oven mitts.


