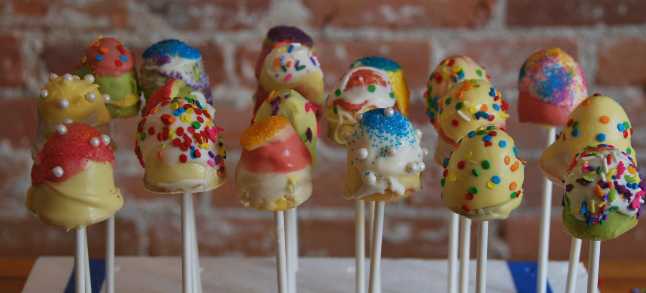
Weaning children away from chocolate at Easter is as likely as finding a magic polka-dot bunny under a snowbank, but some parents and grandparents welcome alternatives. Bingo, the cake pop.
Cake pops are a new addition to birthday parties in Revelstoke, providing a fun way to eat a small amount of cake and lots of icing or candy frosting which most kids do anyway. If you’re tired of sending cake into the bin (I cringe at the thought of all that good butter and flour uneaten on children’s party plates) then cake pops may be the answer.
You will need a pop mold, cake batter, lollypop sticks and candy melts. Most of these are available at Chantilly and I suspect soon will be elsewhere. You also need a stand to prop up the pops as they dry. I made the stand out of two sheets of Styrofoam taped together with masking tape, with holes jabbed in with an awl from the basement.
Purists will want to make their own royal frosting, which I do recommend if you want to avoid the palm oil that’s in almost every other commercial food product known to man, but the candy melts allow dipping, and give a consistency that is soft enough to dip but hard enough when dry to withstand the knocking about these pops do get. One web site uses commercial tinned frosting with a few drops of veggie oil added to get a thinner consistency. This is the easiest answer but will not dry as hard as the candy melts.
The pops were a big hit with my grandchildren, who helped decorate them. There are lots of on-line sites for decorating—google “decorating candy pops” and a host of sites appear. A plan is helpful—you won’t stick to it, but it will get you started.
Some tips you may not find elsewhere:
• plan to make the pops one day and decorate them the next. They must be cold and the sticks well set into the cake pops.
• use baking spray on the pop molds to be sure they come out cleanly. Unsprayed silicone molds work with chocolate, but for the cake batter, buttering or spraying the molds is essential.
• use small glass or ceramic bowls to melt the candy frosting. Special bowls are available commercially. China cereal bowls are good, the deeper the better as this gives more swirl room.
• be very careful when melting the candy frosting—microwave at half power, for increments of no more than 20 seconds, stirring after each. The buds of candy will retain their shape even once they are soft enough to stir into a liquid, and if you overheat them the mixture goes into a hard mess. You can add a few drops of vegetable oil to fix this but lots of stirring is involved.
• stir well when candy is almost melted: the heat of the bowl will continue to keep the texture soft as you stir to get the mixture smooth.
• make the stand for the candied pops ahead of time—you need it ready when the first pop comes out of the pan.
• cool the cake pops in the fridge for 3-4 hours at least, in the stand, so that they are cold when you start to decorate them.
What you need
1. Cake batter. Recipe below is tested, and holds together well for the little pops, and is yummy.
2. Pops mold. I’ve used both silicone and metal from Wilton, and both work well.
3. Candy melts. I used white, green, pink and yellow—had to mix the pink and yellow with candy colouring.
4. Lollypop sticks.
5. Stand to hold the pops. Make one out of two 18” X 12” (approx) sheets of 1” Styrofoam taped together. Make holes for pops 2-3”
apart, with an awl or a long nail.
6. Cake decorating bits: sprinkles, dots, hearts, whatever you fancy.
7. It’s useful to have little baggies to put over the pops. Cellophane or plastic gift baggies work, plus bits of ribbon or twist ties. This isn’t necessary, just useful if you expect the pops to last a few days.
Yellow butter cake for pops
Preheat the oven to 350 degrees and adjust the oven rack so it is low enough for the pan plus lolly sticks to fit into the oven.
¾ cup unsalted butter at room temperature. You can use salted butter, and omit salt below. Non-dairy option is margarine.
1 ½ cups sugar
3 large eggs
1 tsp vanilla
2 cups cake flour
1 ½ tsp baking powder
¼ tsp salt (if you use salted butter omit this extra salt)
¾ cup milk
1 tsp very finely grated orange rind (optional but it gives more flavour; use lemon zest if you want stronger flavour.)
Cream the butter and sugar together, preferably in a mixer, until soft, creamy and very pale yellow. Add the eggs, beating in one at a time. Add the vanilla.
Add flour mixed with baking powder and milk in three parts, mixing well after each addition, ending with flour mixture. Beat well for five minutes in mixer, if possible, or by hand.
This recipe will make about 24. If your mold is smaller, just bake one mold full at a time until batter is used up. I made cupcakes with the leftover.
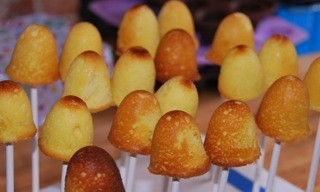
Spray baking oil into pops mold and fill each little cup 2/3 full with cake batter. Place mold on a cookie tray. Set the timer for 15 minutes. Bake in preheated oven 15 minutes. Remove mold from oven and put a lolly stick 2/3 of the way into each pop, then place back in the oven and continue cooking for another 10 minutes, or until the pops are just beginning to brown around the edges. Test for doneness with a toothpick—it will come out clean when done, but be careful not to dislodge the lolly stick.
Cool on a rack for an hour. Then carefully remove the pops from the mold and set into the stand. Refrigerate for at least 4 hours, but preferably overnight.
Decorating your cake pops
1. Set up a work space with bowls for candy melts, a tray for cake decorations, space for the cake pop stand, and a work area. This can get quite messy, in my experience.
2. Melt your candy. Using a ceramic or glass bowl, pour about ¾ cup candy melts into the bowl and microwave at ½ power for 20 seconds at a time, stirring with a small spoon or fork after each power up. Don’t overheat. Stir until smooth and the consistency of thick cream.
3. Mix in colour if desired. Use a toothpick to add colour to the candy—the candy colours are very strong and it’s easy to overdo the colour.
4. Use tiny bowls or egg cups for cake decorations. Have them handy, as they have to be applied while the candy is still soft and moist.
5. Pick up one pop at a time, and swirl it gently in the first colour you want. I used three colours on each pop, adding them once the first layer was dry, and dipping in slightly less each time, so the three colours appear as stripes on the pop.
6. When you decide you want to apply sprinkles or sparkles, dip gently into the decorative element. For dots, sprinkle them on, or apply with tweezers if you want a very specific look.
7. Replace the pops in the stand each time you swirl, so the candy can dry.
8. If candy starts to harden in the bowls, remelt in microwave.
9. Leave your pops to dry for several hours in a cool place once they’re done.
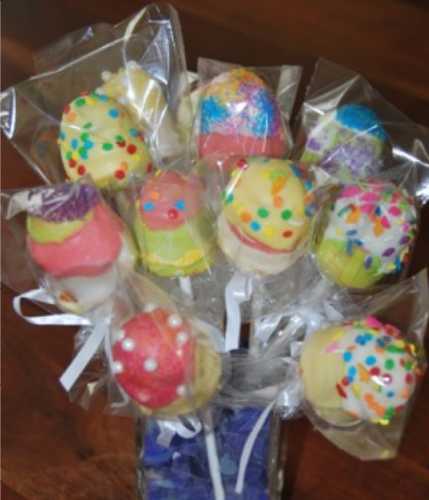
10. If desired, use a small cello bag and a ribbon or twist tie to protect the pops. As a bouquet of pops for a party, this also adds a useful protective layer.
11. Arrange the pops in a basket, vase, ice bucket or bowl, using floral sponge, Styrofoam, glass flower chips or ceramic pastry weights to hold the sticks in place.
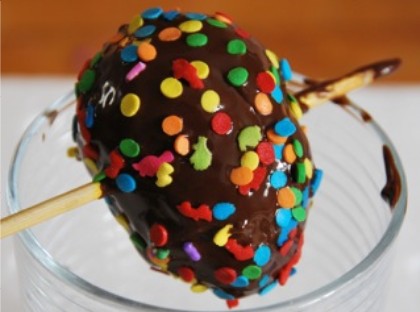
Chocolate Cake Eggs
Molds for cake or chocolate also come in egg shapes. Make the cake and mold it the same way you do the pops.
Each mold makes half an egg.
When the cake eggs are completely cool, unmold them and glue two halves together with candy melt or chocolate glaze. Cool until centre “glue” is totally hard.
Use a skewer to hold the egg as you coat it with chocolate. Put the skewer as exactly through the centre of the egg crosswise as possible. (I broke three cake eggs by not having the skewer centred.) Also, it helps to wait until the centre “glue” is totally firm—about 6 hours.
To coat the eggs with chocolate glaze, melt in the microwave or in a double boiler chocolate from the bulk section of the supermarket—either Foley’s or Callebaut. I have found that the milk chocolate gives a gluey consistency, and prefer to use dark chocolate to which I add enough icing sugar to give a good consistency, and a little cream (NOT WATER WHICH WILL DISTEMPER THE CHOCOLATE) if it needs to be softer. Dip the cake pops in the chocolate rather than in candy melts, and decorate.
You can also buy ready-sweetened chocolate candy melts at Chantilly: these will yield a harder, candy-like surface that is more durable though a little less tasty, than pure chocolate.
Hold the egg over the bowl of melted chocolate by the skewer ends, and swirl gently on all sides. Place the egg over a glass or other container so that it is supported by the skewer and does not touch the sides or the bottom of the glass.
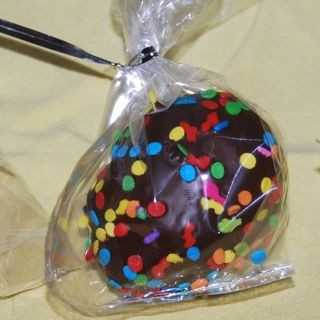
When the chocolate is just beginning to set and harden, sprinkle dots all over it with your fingers. You can, if you’re particular about where they go, use tweezers to place the dots, or sprinkles, but I was interested in a more “abstract” look, so just sprinkled them on. When completely dry, put the egg inside a little cellophane bag and tie with a ribbon.
I plan to make a basket of these chocolate eggs for our crowd of grown-up grandchildren plus friends for Easter, when they are all coming to snowboard at RMR.


