Lemon Pound Cake with Glaze and Piped Roses
Gluten-free Chocolate Cappuccino Cake
With Mother’s Day just around the corner, it’s time for the rest of the family to hone some skills in the kitchen. Making a cake is like making music — you have to pay attention to the audience. Adult cakes tend to be less sweet and less decorated than birthday cakes and celebration goodies.
Here are two cakes that mums may like and that are REALLY easy to make: a lemon pound cake with a tart lemon glaze rather than frosting (although I piped red roses on mine) and a gluten-free rich chocolate cappuccino cake with mocha whipped cream in the middle and plain cream on top.
A few basics about cake making:
- Pre-heating the oven to required temperature is essential. Put the rack in the middle of the oven, too.
- Also mandatory is preparing the pan: smear the insides with about a tablespoon of soft butter or margarine; then trace the bottom of the pan onto a piece of waxed paper or parchment paper, cut it out, and stick it inside the pan. Then butter the paper.
- Leave the butter and eggs out of the fridge so they come to room temperature before you begin.
- Melt chocolate in a double boiler over hot water, or else, in 15 second bursts with stops in between for stirring, in the microwave. Watch like a hawk either way or it will burn and be useless. Do not ever put even a drop of water into melted chocolate or it will “distemper” and you will have to start over again.
- Use only unsalted butter.
- Generally speaking, you mix the butter with the sugar and the eggs, then add other ingredients.
- If you’ve ever made icing and want to pipe little flowers onto the cake, splash out and buy ready-made Wilton frosting along with the disposable piping bag and the appropriate nozzle at Chantilly.
- Use a toothpick or a skewer to test whether the cake is done: it the toothpick comes out gooey, bake another 5 minutes; repeat until the toothpick comes out clean. Don’t over-bake, though — check every five minutes.
Lemon Pound Cake with Lemon Glaze and Roses

This cake looks very pretty baked in a ring angel-food pan. If possible, use a good sturdy one. The ring in the middle should be removable. Butter it thoroughly, and shake flour over the buttered pan to help with removing the cake. (Do this even if the cake tin is supposed to be non-stick.)
The roses are optional. The advantage of using a glaze rather than frosting is 1) it’s easier to do; and 2) it’s less sweet and gives a lovely tart flavour to the cake.
If you want roses, a recipe for icing is included, but it must be VERY stiff, which takes a lot of icing sugar.
The secret to those professional looking cake decorations is, well, professionalism. It takes some special equipment and ingredients. If you’ve never done icing before, buying some is a good idea. Wilton colouring at Chantilly if you want strong and edible colour. To do the roses, you will need a piping bag and a nozzle. These are easy to use once you get the hand of it.
SIDEBAR
The next Basic Cake Decorating class starts May 2 at Chantilly Kitchen, Bed’n Bath on MacKenzie Avenue. It runs four Wednesday nights, 7-9 pm. The fee includes a complete set of decorating equipment. Call 250-837-7005 for details.
Class is just in time to learn the basics for decorating mother’s day cakes!
Ingredients
2 cups cake and pastry flour
1 tsp baking powder
½ tsp salt
½ lb (2 cups or 2 sticks) unsalted butter, softened
2 cups white sugar
grated lemon zest from two large lemons
6 large eggs
2 tsp vanilla
¼ cup milk
¼ cup fresh lemon juice (2 large juicy lemons or 3 small ones)
Pre-heat the oven to 325° F. Prepare the cake tin by buttering the bottom and sides, then if you can, putting a waxed paper bottom inside. Butter the paper, then sprinkle flour inside and shake out the excess.
Put the butter, sugar and lemon zest in a bowl and mash together. Once somewhat blended, beat with electric beaters until pale and creamy. Add the eggs, one at a time, beating after each addition.
Put the flour, baking powder and salt in a bowl and mix. Add this to the butter mixture alternately with the milk and the lemon juice, in three batches, beating after each addition.
Pour into the prepared cake tin and smooth out the top. Bake for 45 to 55 minutes. Remove when a toothpick inserted comes out clean, and cool on a rack for 15 minutes; invert the cake and cool completely, then remove from pan.
Glaze
1 ¼ cups icing sugar
2 tbsp fresh lemon juice
Mix. Poke some holes in the top of the cake with a skewer or toothpick, and carefully spoon the glaze over the cake so that it drips down into the holes. Apply the glaze slowly once the cake is cool, and it will harden as it drips down the inside and the sides.
Frosting Roses
Make a very stiff buttercream with
3 cups icing sugar
½ stick (1/4 cup) of soft unsalted butter
1-2 tbsp milk or cream: add this one teaspoon at a time, making the icing JUST moist enough to stir. Blend or beat with electric beaters.
Add colouring of your choice.
Put the icing into the fridge if you are not using it immediately. It needs to be stiff enough that a knife stuck into it stands up straight rather than leaning to one side. Otherwise the roses will collapse.
Use a plastic pastry bag, a nozzle for roses and what’s called a “coupler,” a two-piece plastic gizmo that holds the nozzle. Practice on a few flowers before you start on the cake. Pipe however many roses you want onto the top of the glaze.
Gluten-Free Chocolate Cappuccino Cake


This is a very easy cake to make. It’s very rich, with eggs and butter and chocolate, and cocoa for structure. This recipe adds coffee-flavoured cream for the centre and plain whipped cream on top. Alternatively, serve with gelato or ice-cream.
Since chocolate is one of the main ingredients, buy the good stuff — Callebaut really does make a difference. It’s available in bulk from major supermarkets. Buy semi-sweet. Also, be sure to use unsalted butter.
A springform pan is best for this cake, but if you don’t have one, use two round or square cake tins and divide the batter between them. If you use two tins, cut the baking time in half.
Ingredients
8 ounces good bittersweet chocolate, chopped or in pieces
½ lb unsalted butter
1 ½ cups white sugar
6 large eggs
1 cup unsweetened cocoa powder
Put chocolate bits and the butter into a saucepan and heat this over hot water until the butter and the chocolate are melted; stir to blend. Remove from heat. Do not let any water get into the mixture or it will turn to an unpleasant mess.
Add the sugar. Pour into a large bowl and let cool for about 10 minutes.
Add the eggs, one at a time, beating well after each addition.
Add the cocoa and carefully stir it in. (It makes an awful mess if you try to do this fast — take your time and keep it all in the bowl.)
Pour the batter into a well buttered cake tin with waxed paper lining that you have also buttered well. Bake for 35 minutes (20 minutes for two pans). Test with toothpick. If not done, bake another minutes. (This cake burns easily, so watch it if you are leaving it in the oven a few minutes longer.)
If possible let the cake sit in the refrigerator overnight before putting it together with the cream.
Cappuccino cream
2 cups whipping cream, very cold
1 tsp instant espresso powder
For topping
1 tbsp icing or white sugar
½ tsp instant espresso powder
Whip the cream with electric beaters until it stands in stiff peaks.
Divide into two bowls.
In one bowl, add the espresso powder and the sugar to the cream. Mix well.
Arrange the cake
Single layer cake
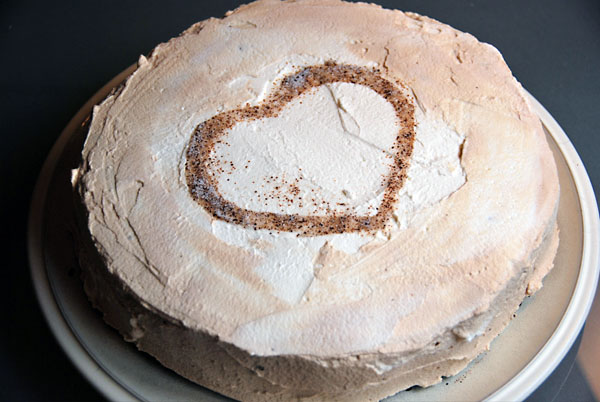
Using a spatula, ice the sides of the cake with the coffee cream. Use the plain cream for the top. Swirl a few rounds of leftover coffee cream onto the top.
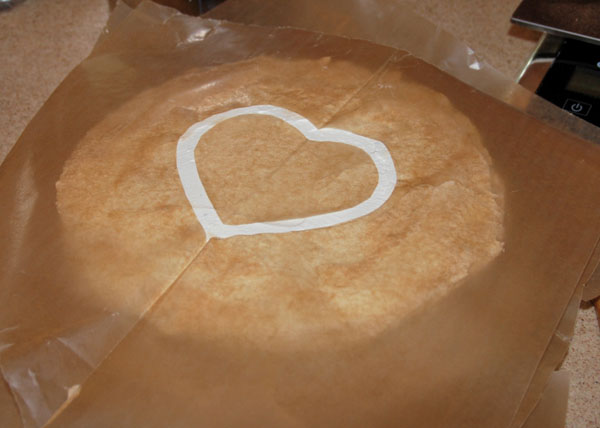
Using a piece of waxed paper, cut out a design. For the heart, I folded the waxed paper in two, cut out a heart, then cut 1 cm off the edges of the cut-out piece. Place the paper gently over the surface of the cream and sift the topping onto the cake where the paper is cut away. Lift the paper gently off, and touch up the cream topping if necessary.
Double layer cake

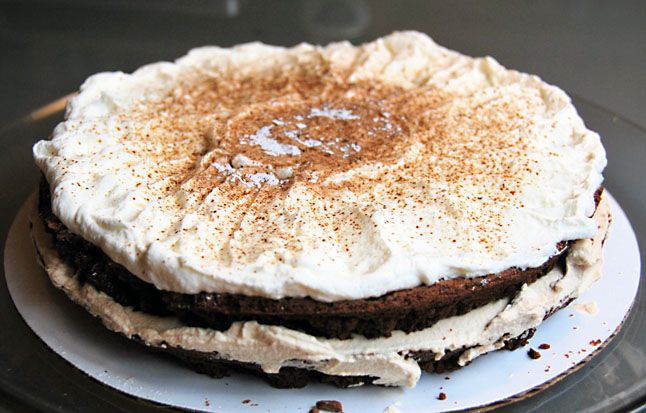
Pile the coffee cream onto the bottom half of the cake and spread it evenly over the surface. Replace the top.
Pile the plain cream on the top of the cake and with a clean spatula, spread it evenly around, making a pretty design if possible with the spatula. Sift a little of the topping over the centre.
Keep cake in refrigerator. This freezes well. Don’t wrap it until it’s solidly frozen if you want to maintain the shape of the cream topping.


